Document Scanning Project Guide
The making of this website was more than the scanning and researching you’ve likely explored so far. Hosting a priceless collection of this scale required tapping into my experience as a professional software engineer. We needed a place to safely store the files, but how do we get terabytes of data to visitors quickly and as cheaply as possible?
On this page you’ll find a deep dive into how I got this project to work from a technical implementation perspective. From my recommendations on scanners and file naming, to the providers, CDN, and caching implementations.
My goal for this write up is to provide you or your organization with a starting point to implement a similar kind of archive. Going to independent contractors or consultants will cost you thousands in setup fees and high ongoing costs. This is a project you can do on your own for under $10 a month in ongoing costs. I encourage you to give it a go.
Physical Scanning
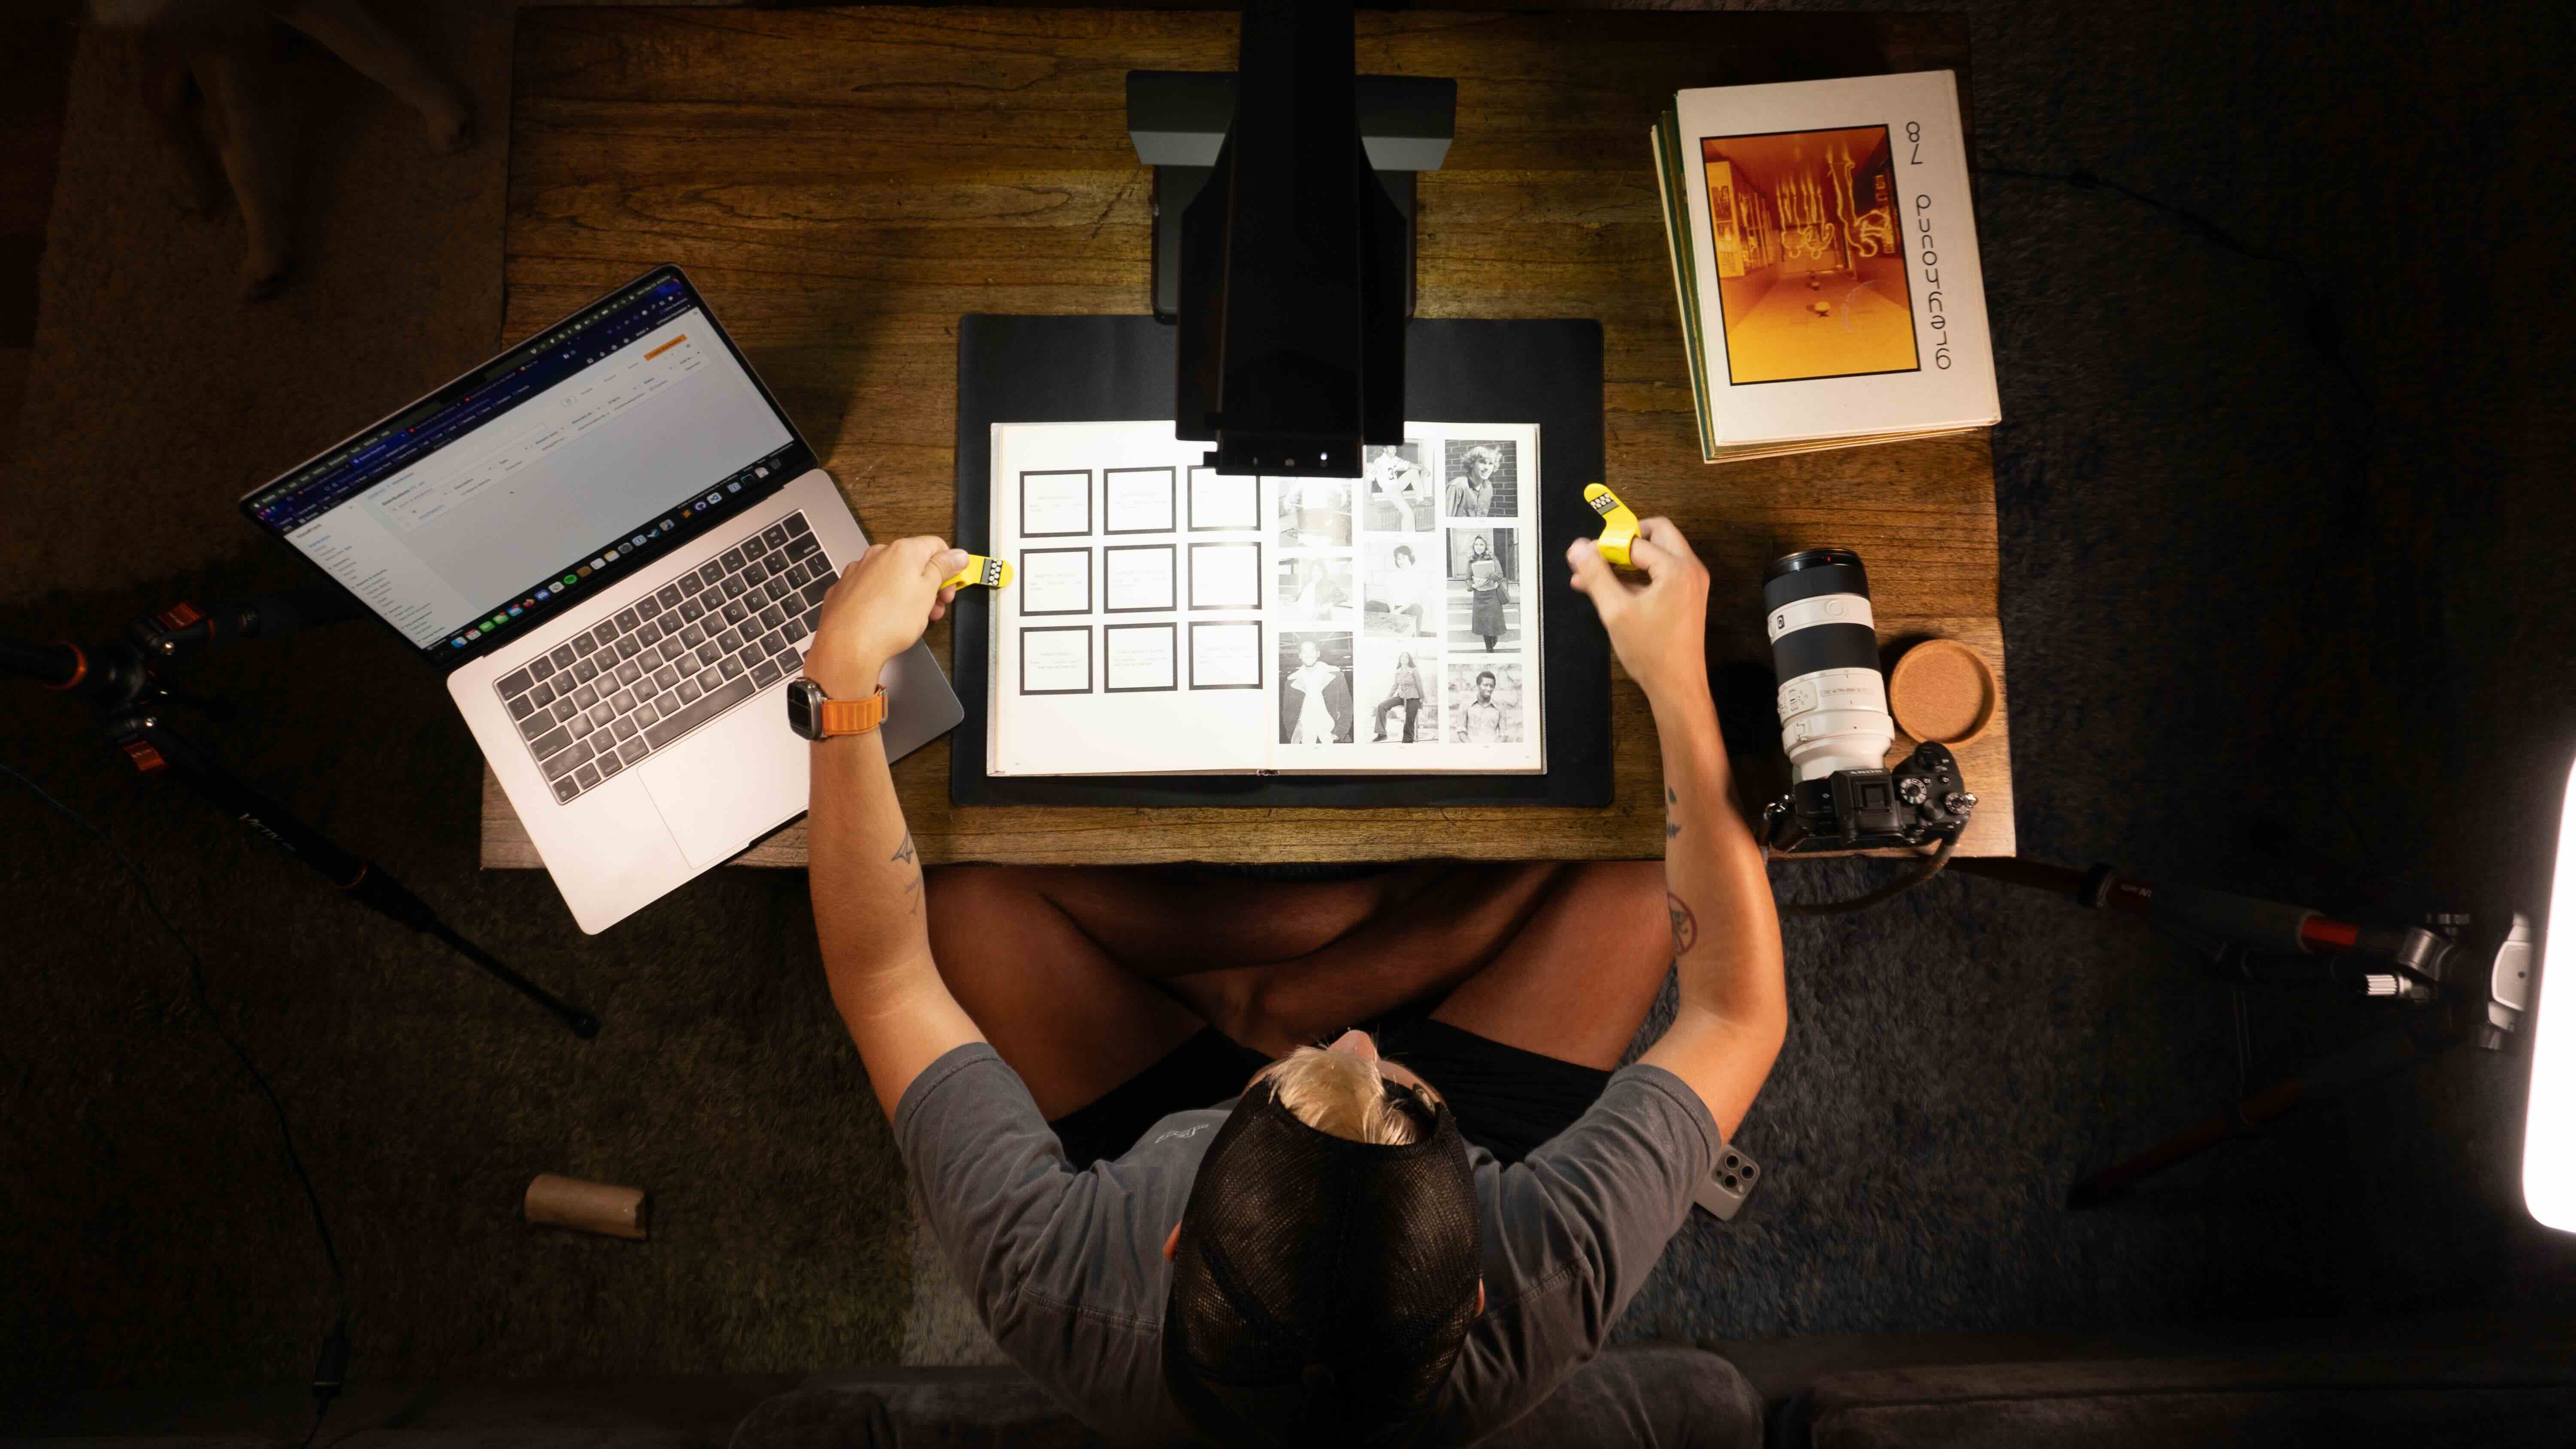
First and foremost, how do you go about scanning documents hundreds of years old in a safe and efficient manner?
Destructive vs Nondestructive Scanning
There are two primary forms of document scanning relevant to us in this project:
Destructive scanning refers to the process of removing the binding of a book to achieve truly flat scanning of its contents. The flatter the pages, the higher the quality and true to life the scans will be. However, the obvious downside is the permanent alteration of a priceless document.
Nondestructive scanning is the more historically friendly option of preservation. With this approach we’re able to obtain a relatively high quality scan of a work while maintaining the integrity of the physical copy. The upside here is that we’re able to scan priceless documents, however it’s more expensive, time intensive, and cumbersome to get the scan quality on par with that with destructive scanning.
The documents I used for this project were not my own property and on loan from various public and private collections. Needless to say, destructive scanning was an obvious no go from the beginning. Convincing others to loan you their prized memories and collections requires a strong foundation of trust. Your contributors want to know they’ll contribute to a project for the common good, but that their property won’t suffer for that greater good. Said another way, they’ll want their property back in the same condition they leant it to you in. This goes well beyond just the physical scanning, but we’ll cover that in a later section.
The Scanner
I wish I could tell you that I meticulously scoured the internet for reviews, side by side comparisons, and accolades about which scanners to use. Further, I wish I had the ability to rent or trial run different scanners prior to committing to purchasing one.
Unlike cameras, the market for document scanners is a niche one. Whereas I can easily rent a $4,000 camera for a weekend to give it a trial run for $100, the same is not true for document scanners. The target audience for this kind of equipment is professionals and the rental fees alone are cost prohibitive to any small scale project like this one.
After looking through several articles, Amazon reviews, and other forum posts about projects similar to mine, I came across the CZUR ET24 Pro scanner. CZUR appears to be a Shenzhen, China based company specializing in prosumer document scanners at relatively affordable prices. The selling feature for my application was the ability to scan bound pages into a flat image as if they were scanned in a document feeder or flatbed. My understanding from using it is that, when put in the “open cover” mode, a scan of an open book uses lasers to detect the curvature of each page. Once the digital image has been scanned, the providing scanning software interprets the laser markings to digitally unbend the pages. The scanner cost around $550 at the time I purchased it.
Throughout my research I also came across several custom rig scanners. You could, with some ingenuity and online schematics, construct an entire rig complete with 2 mirrorless cameras to perform non-destructive scanning. Understandably, it’s expensive and requires a good deal of material procurement and construction. Some use plexiglass or a similar material to press down on the pages at an angle to non-destructively get a truly flat image of each page. Even if I were able (and willing) to build such a rig (which may be appropriate for your project), I’d need to rent the cameras. I have two nice mirrorless Sony cameras, but they’d need to be identical in model, lens, etc. At time of writing, it costs around $300 to rent a Sony A7R4 and accompanying lens per week. I’d need two of them. If I were to go the route of building and renting, I would have spent close to $5,000 over the period I was scanning. This wasn’t the right solution for my use case, but could be for yours if you have access to the funds or have a longer spanning project that could benefit from an in-house solution you ultimately own.
To be clear, I am in no way endorsing or recommending the purchase of the CZUR scanner I used for this project. I bought it, I used it, and it worked well enough for this project. What your project calls for may require another solution altogether. Don’t feel that you need to emulate exactly what I did here. No matter which avenue you go, you’ll find a way to adapt to the challenges you encounter along the way. They come up and you’ll conquer them regardless of which equipment you have.
Tech Stack
I’m a diehard LucidChart fan. I use it professionally for software architecture diagrams and making software documentation more friendly to visual learners. Here is no exception. If my coworkers saw this they'd laugh. Below is a Lucidchart diagram of the architecture of how this website and archive is hosted.
File Storage
Arguably the most critical aspect of the entire project is the hosting of the PDF scans themselves. Our goal is to store the scans somewhere safe that will hopefully outlast the physical copies, but also in such a way that doesn’t break the bank for a limited budget project.
Design
Originally the documents and yearbooks were stored in AWS S3 and made publicly accessible. S3 works well and I have years of experience using it for projects professionally, plus any costs were covered by the non-profit credits AWS awards yearly. I had also explored Cloudflare’s R2 storage solution, but Cloudflare doesn’t offer non-profit credits. Although the cost would be minimal, having everything with one service and one bill makes it a lot easier to maintain in skeleton crew mode over time. I currently have 15 AWS accounts for various projects scattered about. They all have consolidated billing, but managing the credentials and remembering which domains are where is more trouble than it’s worth. In the end, I chose S3.
I knew it could be a risk, but again, I thought about the size of the community, the number of potential viewers, the size of the files, etc. and concluded the original burst of attention would barely surpass the included AWS egress cap.
Changing Providers
The fatal mistake was underestimating the traffic the website would receive. With 2,900 unique viewers in the first day and most viewers having 13 yearbooks they’re in, over 2 TB of data egress was encountered in the first 24 hours. The first 24 hours cost me over $250 in egress fees alone. This took a big chunk out of the yearly credits available to me, ones I’d been saving for OCR document conversion.
AWS S3 was too expensive at scale for a project that has a few really large files, as opposed to a bunch of really tiny ones which would be a different story. I’m glad I had experience with CloudFlare ahead of time as I now needed to switch all the content links on the site to the new Cloudflare R2 URLs. However, I had chosen to hard code PDF document links in the HTML to avoid needing a database and potentially save on hosting by serving static content. I stayed up that night converting the direct links to some conversion functions in PHP. I could flip between a S3 and Cloudflare link for each file if I needed to. I flipped everything over to Cloudflare that evening and spent $0 from there on out in egress fees. It costs around $0.60 monthly in Cloudflare R2 storage fees to host the document and yearbook archives.
I’m extremely pleased with Cloudflare R2 and how easy it was to set up. The longest part was the upload of the 30+ GB. The DNS setup for custom domain file access took seconds. Now I’m able to serve yearbooks up at yearbooks.chartiersvalley.com natively from R2. How cute.
Replication
Something that crossed my mind several times throughout the project is how impressive it was that documents from 1925 managed to survive multiple wars and cultural shifts. One wrong misplace, yard sale, or fire could result in it being lost to time forever. Digital media is much more prone to being lost, however thankfully much more easily replicable. A general rule of thumb for storage is 3 copies of data. One where you’re actively using it, one on a backup drive, and one off-site.
I continue to host a mirror of all the documents and yearbooks in S3. Cloudflare provides the public access for visitors and the S3 buckets are not publicly accessible. The S3 bucket is in Northern Virginia (US-East-1) and replicates everything to Stockholm, Sweden (EU-North-1) where they’re stored in the S3 Deep Glacier storage tier.
This replication strategy ensures that all the documents are accessible and available, secure, and have backups in other territories in the event of catastrophic failure in one region of the world. While I expect to never need to reference the files in Stockholm, I sleep a little better knowing they’re there and that it’s unlikely these precious PDF scans will ever be lost.
If you embark on something like this project and have a reasonable size of data, I’d recommend replication of some form in another region to protect from accidental loss. Additionally, it may make sense to have replicas with other providers like I do with Cloudflare and AWS. We’ve all read the story on how Google Cloud accidentally deleted the entire account and all backups of a multi-billion dollar pension fund. Luckily they had backups with another provider which saved them from complete data loss.
The Website
But Make it PHP
Yeah yeah let’s hear the jokes.
When I chose to design this website, the closer you can get to a static site the cheaper it is to host. In fact, if you can build a truly static website, you can host it on Cloudflare for free under their Pages program. I host my gaming community websites and game development projects this way. I didn’t have the time to re-learn Angular or React for this project, so I went with ol’ reliable and chose PHP. I taught myself PHP at 8 years old and have been using it sparingly ever since.
If I had to do it again, I’d do it in React or a similar framework. Unless you need a backing database, it’s just going to be easier in the long run to host and operate. You can likely remove all the deploy, Cloudfront, and other custom caching layers if you are able to host statically.
Architecture
Alright so we’re not hosting this website statically with PHP being server side, so we’ve already set ourselves up for some fun architectural challenges.
The code for the website itself is in a GitHub repository. When a push is made to the main branch, AWS CodePipeline will copy the current branch and deploy it to the AWS Elastic Beanstalk instance hosting the PHP site. I did single-node elastic beanstalk (since it will be cached as we’ll discuss), but it can cause downtime when CodePipeline deploys over the existing deployment.
Between the visitor and the elastic beanstalk instance was AWS CloudFront. The CDN allowed me to easily cache the website and provide custom SSL certificates. CloudFront did a decent job, but again has an included bandwidth cap of 1TB and you have to pay $30+ a month for features like bot and DDOS protection. The included metrics for Cloudfront are fine, but it doesn’t spark joy in the way I’d hoped.
After I’d moved the file hosting from AWS to Cloudflare, I wanted to experiment using Cloudflare as the CDN for the website for free. Out of the box (and for free) were a whole suite of features like scraping protection, AI scraper detection, email obfuscation, custom SSL certs, and more. After some testing with one of the main domains to serve a subset of visitors, I decided Cloudflare made more sense.
I changed the nameservers over to Cloudflare and watched the traffic begin to spill over. The included metrics and dashboards now show me visitors, rejected bots, overall download bandwidth from R2, and similar metrics from a single dashboard. Did I mention it was free? I’m extremely happy with my decision to switch to Cloudflare and would use it from the get go if I had to do it again. Every time I’m asked about the statistics of the project from the early days I have to amalgamate CloudFront’s meh metrics, Google Analytics, AWS S3 bills, and Cloudflare. If I could have it all in one place, that’d have been ideal.
No Database?
When I designed and built the CVTheatre website years ago, I used a MySQL database to provide the backing data structure for the show history, awards, links, etc. I wondered if the ability to query would ever become useful for a research project like this one. I think I overestimated at the time the scope of impact of the theater’s site alone. The database still drives the display there, but the data changes maybe twice per year. For this project, I chose not to use a database but instead hard-code the document links in the HTML.
Final Takeaways
With all of that said, I have a few final takeaways I learned along the way that I'd like to share:
- You may not like it, but social media is one of the most effective tools for spreading word of your project, locating friends who may know what you’re looking for, and tracking down things to scan. Facebook was most helpful in my scenario given the demographic I was targeting and locality-based nature, however new and emerging social media platforms may work just as well depending on your scale.
- Don’t be afraid to annoy people. Use good judgment. People are busy with work and life, your email or Facebook message may have not made it to them. That doesn’t mean they’re not interested. That doesn’t mean they don’t want to speak to you. Sometimes it requires reaching out multiple times or meeting them where they’re at.
- Setup a dedicated project email and get a texting service phone number (like Google Voice). The internet is weird, and sometimes so too are the people you meet on it. I recommend keeping a degree of separation between yourself and those you come in contact with at first. You could one day be thankful you have a burner phone number instead of needing to replace your cell phone number you’ve had since you were a teenager.
- Copyright laws are a thing and can be used against you. Know your rights and know the limitations of them. The Digital Millennium Copyright Act covers fair use cases but it’s an intentionally gray area for interpretation. If you can, get permission. If you can’t, use good judgment and consult professionals who can properly advise you. I got permission directly from the schools who produce the yearbooks which constituted an agreement.
- Use a spreadsheet. A nice Google Doc to color code your progress tracking things down, who leant it to you, what you need to return, etc. come in handy once you pick up momentum and are swimming in books. It makes it a lot easier to populate your database or web page down the road, too.
- Don’t be afraid to roll your own website setup. There are a ton of services out there that make it easy to deploy your website with exorbitant ongoing fees. The website portion itself can almost always be hosted for free. The files you’ll always almost have to pay for. Look into Cloudflare Pages for free static web hosting. I am not endorsing nor affiliated with them, I’ve just had good success with their tools thus far.
- Beware of scope creep. This is true for most projects in life. In yours, one lead might lead to another which leads to an entirely different can of worms. Define your “North Star” of what you want your project to be and what you can hold yourself accountable for. When taking on a new task you can compare it to your goal to see if it fits the mission, or could be a future revision or exploration.
- Setbacks and burn out might be part of your adventure. That’s ok, it happens. Take a break. Take some time to step back and get a view of the landscape you’re in. Need to take a few weeks off? Do it. You’re taking this project on because you’re passionate about it. If you do it when you’re not in it, you’ll come to resent it.
- Finally, be proud of yourself. This is hard. Your project will be hard. When you share it out and get it in front of others, be sure to take a moment to take it all in. You built something that touched the lives of others. Be proud of that. Be proud of how you got here. Be proud of the twists and turns you navigated. There’s a reason nobody else has completed your project before you.
Have Questions
If you have questions about anything mentioned here or about another part of the process I didn't cover, please get in touch. I'd love to chat with you about your project and help out!